This post will go over command handling with Discord.Net. Whether you are following along from the Raspberry Pi series, or are just curious about how to do command handling with Discord.Net, welcome!
I am currently in the process of updating this guide to use the new /Slash Command implementation, as you will need a new intent to use the old way (having the bot parse messages)
Prerequisites
.NET 6.x
…and we will be building upon the framework laid out here:
If you want to follow along with the finished code, go here: https://github.com/gngrninja/csharpi/tree/02-command-basics.
If you would like the starter code, and want to try building off of it yourself, go here: https://github.com/gngrninja/csharpi/tree/intro.
To keep up with Discord.Net examples and specifics, their repo has code samples: Discord.Net/samples at dev · discord-net/Discord.Net (github.com)
Navigation
Adding the Command Handler
The first thing we’ll want to do is add the command handling service.
This service will be responsible for:
Hooking into the SlashCommandExecuted, ContextCommandExecuted, and ComponentCommandExecuted events to process commands as they come in (to see if they are a valid command), and handle command execution (success/failure/not found actions)
Utilizing Dependency Injection in .NET to setup and pass through services/configurations
Loading all the command modules that inherit from InteractionModuleBase
Command Handler Service Creation
The first thing we want to do here is create the command handling service.
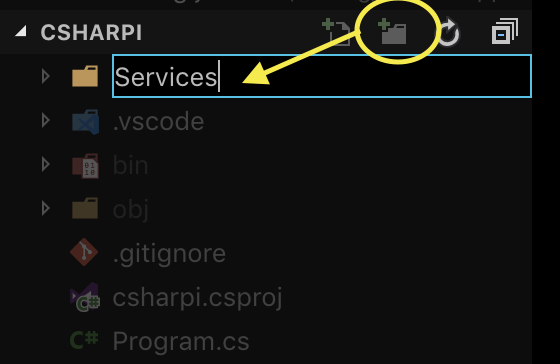
Create a folder named Services, and under that folder a file named CommandHandler.cs.
2. Here is the code for the command handling service, with comments to help understand what is happening (don’t worry too much about not understanding what is happening, yet!):
You can always view the most updated code, here: https://github.com/gngrninja/csharpi/blob/02-command-basics/Services/CommandHandler.cs.
1 2 3 4 5 6 7 8 9 10 11 12 13 14 15 16 17 18 19 20 21 22 23 24 25 26 27 28 29 30 31 32 33 34 35 36 37 38 39 40 41 42 43 44 45 46 47 48 49 50 51 52 53 54 55 56 57 58 59 60 61 62 63 64 65 66 67 68 69 70 71 72 73 74 75 76 77 78 79 80 81 82 83 84 85 86 87 88 89 90 91 92 93 94 95 96 97 98 99 100 101 102 103 104 105 106 107 108 109 110 111 112 113 114 115 116 117 118 119 120 121 122 123 124 125 126 127 128 129 130 131 132 133 134 135 136 137 138 139 140 141 142 143 144 145 146 147 | using Discord; using Discord.Interactions; using Discord.WebSocket; using System; using System.Collections.Generic; using System.Linq; using System.Reflection; using System.Text; using System.Threading.Tasks; namespace csharpi.Services { public class CommandHandler { private readonly DiscordSocketClient _client; private readonly InteractionService _commands; private readonly IServiceProvider _services; public CommandHandler(DiscordSocketClient client, InteractionService commands, IServiceProvider services) { _client = client; _commands = commands; _services = services; } public async Task InitializeAsync() { // add the public modules that inherit InteractionModuleBase<T> to the InteractionService await _commands.AddModulesAsync(Assembly.GetEntryAssembly(), _services); // process the InteractionCreated payloads to execute Interactions commands _client.InteractionCreated += HandleInteraction; // process the command execution results _commands.SlashCommandExecuted += SlashCommandExecuted; _commands.ContextCommandExecuted += ContextCommandExecuted; _commands.ComponentCommandExecuted += ComponentCommandExecuted; } private Task ComponentCommandExecuted(ComponentCommandInfo arg1, Discord.IInteractionContext arg2, IResult arg3) { if (!arg3.IsSuccess) { switch (arg3.Error) { case InteractionCommandError.UnmetPrecondition: // implement break; case InteractionCommandError.UnknownCommand: // implement break; case InteractionCommandError.BadArgs: // implement break; case InteractionCommandError.Exception: // implement break; case InteractionCommandError.Unsuccessful: // implement break; default: break; } } return Task.CompletedTask; } private Task ContextCommandExecuted(ContextCommandInfo arg1, Discord.IInteractionContext arg2, IResult arg3) { if (!arg3.IsSuccess) { switch (arg3.Error) { case InteractionCommandError.UnmetPrecondition: // implement break; case InteractionCommandError.UnknownCommand: // implement break; case InteractionCommandError.BadArgs: // implement break; case InteractionCommandError.Exception: // implement break; case InteractionCommandError.Unsuccessful: // implement break; default: break; } } return Task.CompletedTask; } private Task SlashCommandExecuted(SlashCommandInfo arg1, Discord.IInteractionContext arg2, IResult arg3) { if (!arg3.IsSuccess) { switch (arg3.Error) { case InteractionCommandError.UnmetPrecondition: // implement break; case InteractionCommandError.UnknownCommand: // implement break; case InteractionCommandError.BadArgs: // implement break; case InteractionCommandError.Exception: // implement break; case InteractionCommandError.Unsuccessful: // implement break; default: break; } } return Task.CompletedTask; } private async Task HandleInteraction (SocketInteraction arg) { try { // create an execution context that matches the generic type parameter of your InteractionModuleBase<T> modules var ctx = new SocketInteractionContext(_client, arg); await _commands.ExecuteCommandAsync(ctx, _services); } catch (Exception ex) { Console.WriteLine(ex); // if a Slash Command execution fails it is most likely that the original interaction acknowledgement will persist. It is a good idea to delete the original // response, or at least let the user know that something went wrong during the command execution. if(arg.Type == InteractionType.ApplicationCommand) { await arg.GetOriginalResponseAsync().ContinueWith(async (msg) => await msg.Result.DeleteAsync()); } } } } } |
[top]
Adding your test Discord guild id to config.json
Remember :
When debugging you want the config.json file in /bin/Debug/net6.0/
When running the bot normally via dotnet projectname.dll, you want the config.json file in the root folder (same folder as the .dll/executable)
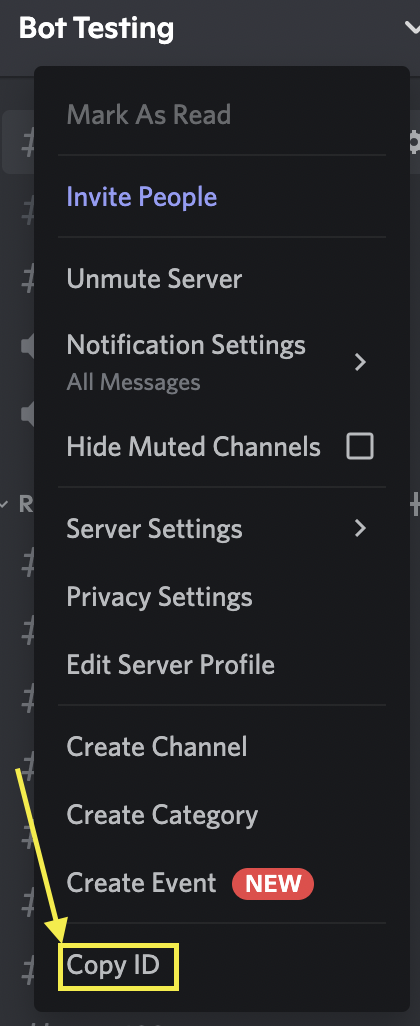
You can find your Discord guild(server) id by right clicking on your server name, and going to Copy ID
To add the Guild id, your config.json should look like this:
{
    "Token":  "ThIsIsNtMyToKeN",
    "TestGuildId": "123456789101112131415"
}
Now what we have created our CommandHandler service, let’s wire up Program.cs to enable dependency injection and use it.
[top]
Adding Dependency Injection
Add NuGet Package for Dependency Injection
When using the Discord.Net v3.2.0 library, I noticed that I had to manually add the Dependency Injection package. To do this, drop down to your command line, navigate to the project folder, and run:
dotnet add package Microsoft.Extensions.DependencyInjection --version 6.0.0
dotnet restore
Next we’ll want to modify Program.cs to add dependency injection.
What we need to do in Program.cs:
Add a using statement to gain access to the service we created
- For this example that’s using chsarpi.Services;Create a method that will construct the dependency injection model / ServicesProvider for the model we can consume later (ConfigureServices)
Call upon and use the ConfigureServices method, and work with the bot code via dependency injection
Below is the sample code to achieve what I’ve gone over above:
You can always view the most updated code, here: https://github.com/gngrninja/csharpi/blob/02-command-basics/Program.cs
1 2 3 4 5 6 7 8 9 10 11 12 13 14 15 16 17 18 19 20 21 22 23 24 25 26 27 28 29 30 31 32 33 34 35 36 37 38 39 40 41 42 43 44 45 46 47 48 49 50 51 52 53 54 55 56 57 58 59 60 61 62 63 64 65 66 67 68 69 70 71 72 73 74 75 76 77 78 79 80 81 82 83 84 85 86 87 88 89 90 91 92 93 94 95 96 97 98 99 100 101 102 103 104 105 106 107 108 109 110 111 112 113 114 115 116 | using System; using Discord; using Discord.Net; using Discord.Commands; using Discord.Interactions; using Discord.WebSocket; using System.Threading.Tasks; using Microsoft.Extensions.Configuration; using Microsoft.Extensions.Configuration.Json; using Microsoft.Extensions.DependencyInjection; using csharpi.Services; using System.Threading; namespace csharpi { class Program { // setup our fields we assign later private readonly IConfiguration _config; private DiscordSocketClient _client; private InteractionService _commands; private ulong _testGuildId; public static Task Main(string[] args) => new Program().MainAsync(); public async Task MainAsync(string[] args) { } public Program() { // create the configuration var _builder = new ConfigurationBuilder() .SetBasePath(AppContext.BaseDirectory) .AddJsonFile(path: "config.json"); // build the configuration and assign to _config _config = _builder.Build(); _testGuildId = ulong.Parse(_config["TestGuildId"]); } public async Task MainAsync() { // call ConfigureServices to create the ServiceCollection/Provider for passing around the services using (var services = ConfigureServices()) { // get the client and assign to client // you get the services via GetRequiredService<T> var client = services.GetRequiredService<DiscordSocketClient>(); var commands = services.GetRequiredService<InteractionService>(); _client = client; _commands = commands; // setup logging and the ready event client.Log += LogAsync; commands.Log += LogAsync; client.Ready += ReadyAsync; // this is where we get the Token value from the configuration file, and start the bot await client.LoginAsync(TokenType.Bot, _config["Token"]); await client.StartAsync(); // we get the CommandHandler class here and call the InitializeAsync method to start things up for the CommandHandler service await services.GetRequiredService<CommandHandler>().InitializeAsync(); await Task.Delay(Timeout.Infinite); } } private Task LogAsync(LogMessage log) { Console.WriteLine(log.ToString()); return Task.CompletedTask; } private async Task ReadyAsync() { if (IsDebug()) { // this is where you put the id of the test discord guild System.Console.WriteLine($"In debug mode, adding commands to {_testGuildId}..."); await _commands.RegisterCommandsToGuildAsync(_testGuildId); } else { // this method will add commands globally, but can take around an hour await _commands.RegisterCommandsGloballyAsync(true); } Console.WriteLine($"Connected as -> [{_client.CurrentUser}] :)"); } // this method handles the ServiceCollection creation/configuration, and builds out the service provider we can call on later private ServiceProvider ConfigureServices() { // this returns a ServiceProvider that is used later to call for those services // we can add types we have access to here, hence adding the new using statement: // using csharpi.Services; return new ServiceCollection() .AddSingleton(_config) .AddSingleton<DiscordSocketClient>() .AddSingleton(x => new InteractionService(x.GetRequiredService<DiscordSocketClient>())) .AddSingleton<CommandHandler>() .BuildServiceProvider(); } static bool IsDebug ( ) { #if DEBUG return true; #else return false; #endif } } } |
Now that we’re wired up to use dependency injection, and have our service created to handle commands, let’s create our first set of commands (the right way!).
[top]
Writing Robust Commands
In this section we will be writing our first real, robust command. Writing commands this way gives us access to Discord.Net’s command writing goodness.
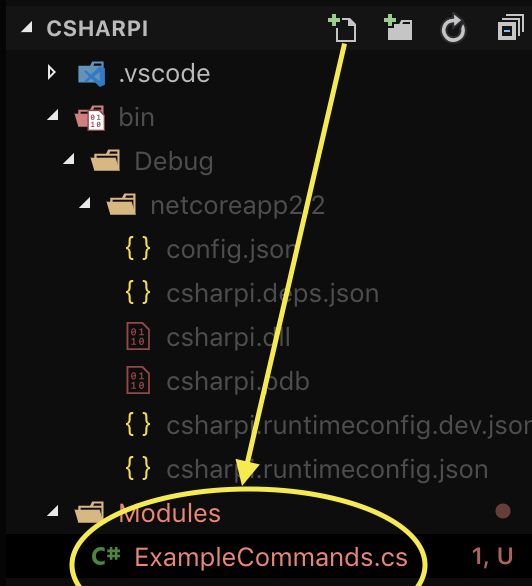
1. Create a folder named Modules, and under that folder a file named ExampleCommands.cs.
ExampleCommands will contain our first command using this framework!
Below I have some code that will get us started with an 8-ball command:
You can always find the most up to date code, here: https://github.com/gngrninja/csharpi/blob/02-command-basics/Modules/ExampleCommands.cs
1 2 3 4 5 6 7 8 9 10 11 12 13 14 15 16 17 18 19 20 21 22 23 24 25 26 27 28 29 30 31 32 33 34 35 36 37 38 39 40 41 42 43 44 45 | using Discord; using Discord.Interactions; using Discord.WebSocket; using System; using System.Collections.Generic; using System.Linq; using System.Text; using System.Threading.Tasks; namespace csharpi.Services { // interation modules must be public and inherit from an IInterationModuleBase public class ExampleCommands : InteractionModuleBase<SocketInteractionContext> { // dependencies can be accessed through Property injection, public properties with public setters will be set by the service provider public InteractionService Commands { get; set; } private CommandHandler _handler; // constructor injection is also a valid way to access the dependecies public ExampleCommands (CommandHandler handler) { _handler = handler; } // our first /command! [SlashCommand("8ball", "find your answer!")] public async Task EightBall(string question) { // create a list of possible replies var replies = new List<string>(); // add our possible replies replies.Add("yes"); replies.Add("no"); replies.Add("maybe"); replies.Add("hazzzzy...."); // get the answer var answer = replies[new Random().Next(replies.Count - 1)]; // reply with the answer await RespondAsync($"You asked: [**{question}**], and your answer is: [**{answer}**]"); } } } |
That’s it! Now we’re ready to debug/test to see if it is all working!
Remember it is F5 in VS Code, or you can use [Debug] -> [Start Debugging] from the menu bar.
8-Ball Command
Now that the bot is running, we can test our 8-ball command.
Go into the server your bot is in, and type the following:
/8
The command should show up as an autocomplete, and if you hit enter it will ask for the question:
Type out your question, and hit enter!
[top]
Getting it Working on the Pi
To get this working on our Raspberry Pi we will simply need to push the updated code to the Github repo, and pull it down to the Pi. We will need to update our config.json on the Pi, and copy it to the debug folder, as well as the bot folder (after we’ve added the Prefix line). If you’d like more information on getting the initial setup done with the Raspberry Pi, visit the below post and check out it’s prerequisites as well!
The below steps all assume we are sshed into our Pi.
Switching Branches on Git
If you are following along, and want to use my Github repo as reference, you must ensure you’re working with the proper branch for this post.
First you’ll want to get into the directory:
cd csharpiThen, you want to run:
git checkout 02-command-basicsgit pullYou can see here we are in the intro branch, and we need to switch it up!
Pi config.json Editing
Now that we have the latest code on the Pi (refresher here if you’re using your own repo), let’s edit the config.json file to add the command prefix we want to use.
You’ll want to be in the cloned git repo’s directory, and assuming you have the base config created there from the linked post above, run (if you don’t, create it by using touch config.json):
nano config.jsonIn this file we want to ensure the Token and TestGuildId are there as such:
{
    "Token":  "ThIsIsNtMyToKeN",
    "TestGuildId": ";"
}
Use the following sequence to save the contents:
CTRL+O
[Enter]
CTRL+X
Now let’s copy that to the debug folder so we can test/debug the code, and to the bot’s published location:
cp config.json bin/Debug/net6.0/
cp config.json ~/bot
Let’s test the code from the Git repo…
Test Code From Repo
Now that we copied the new config.json file over to the Debug folder, we can test things out. Ensure you’re in the repo’s folder and run (remember, this method of running the bot takes a while to start):
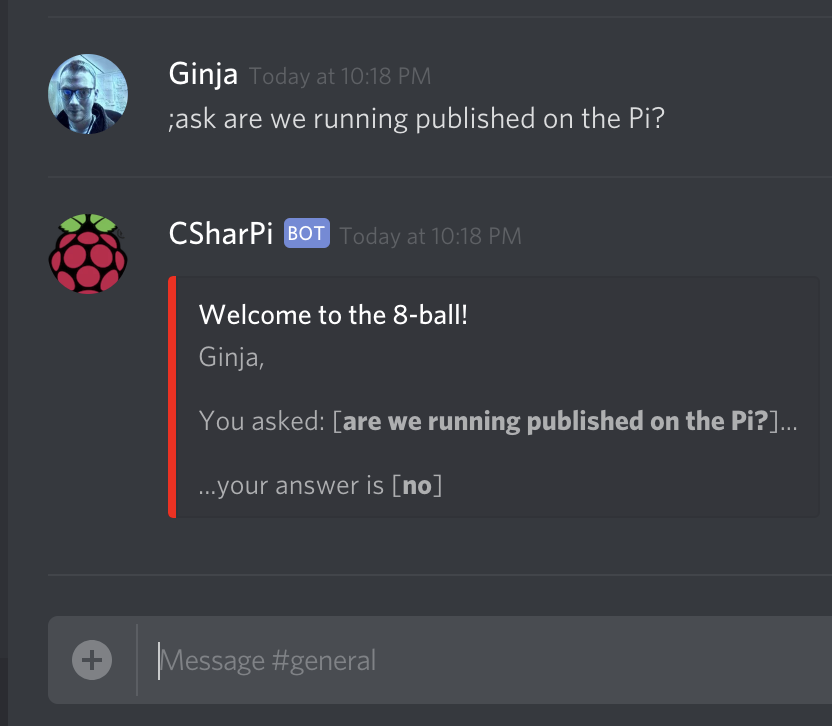
dotnet runNow to run a command in Discord just to be sure…
Success! Now to get it published and run it properly.
Running Published Code on Pi
Let’s get things published and running smoothly! To start out, ensure you are in the git repo’s folder and run:
dotnet publish -o ~/botThen you’ll want to get into the bot’s folder:
cd ~/botAnd finally, you can run:
dotnet csharpi.dllLooks good, but one more test with Discord to really be sure!
Conclusion
In this post we added some proper command handling to our Discord bot.
Feel free to change things around and see what you can make happen (or break and fix… break + fix = learn, right?).
In the next part of this series, we will add proper logging to the bot.
If you have any questions or comments, leave them below!


