
Getting Started - Modules
Welcome to my Getting Started with Windows PowerShell series!
In case you missed the earlier posts, you can check them out here:
We will be exploring:
Note: I reccommend getting used to / switching to Visual Studio Code if you can. It is lightweight, has GREAT extensions/themes, and can be used for much, much more than just PowerShell. Check it out here: https://code.visualstudio.com/docs/languages/powershell
What are modules?
Modules in PowerShell are a way to aggregate functions into one file and then re-use them later. There are various different module types, but we'll be focusing on Script Modules. If you find yourself reusing functions here and there, it may be time to create a module in PowerShell.
If you are here, already know all of this, and want a framework for creating a standard PowerShell module, check out this project on GitHub: https://github.com/devblackops/Stucco.
Script modules require these basic items:
A file with code in it (for script modules this will be a .psm1 file)
Any required modules / scripts that the module itself requires
A folder that has the module name stored where PowerShell can import the module
This isn't exactly required, but is is immensely helpful: a manifest file that contains metadata (version/author/file info).
List available modules
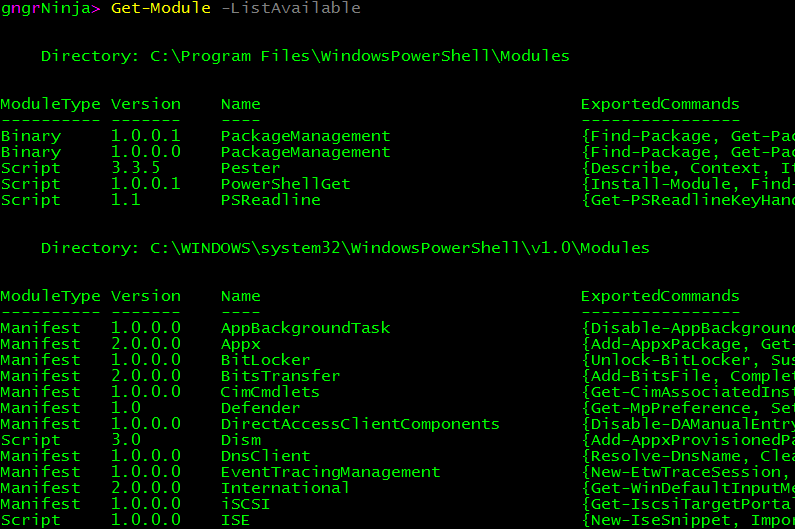
In PowerShell, you can see what modules are available to you by using the following command:
Get-Module -ListAvailableThis command will list the modules available to you, and show you which folder they are located in.
To see what modules you are currently using in your session, type:
Get-Module
If you 'd like to see what commands a module has available, use:
Get-Command -Module DnsClientThe above command will show us the commands available in the DnsClient module.

Let's try to use one of the commands from the DnsClient module.
Clear-DnsClientCache
By all appearances it looks like that worked! Interesting. Let's have a look at seeing what modules are installed again.
Get-Module
It looks like the module was automatically imported into PowerShell when we used one of its commands. That is because starting in PowerShell version 3.0, modules that are available via Get-Module -ListAvailable will be automatically imported if one of their commands are used.
Creating modules
PowerShell modules available via Get-Module -ListAvailable are stored in folders listed in the environment variable PSModulePath. Use the following commands to see where the folders are:
(Get-ChildItem Env:\PSModulePath).Value.Split(';')
The folders:
C:\Program Files\WindowsPowerShell\Modules
C:\Windows\system32\WindowsPowerShell\v1.0\Modules
Contain modules that will be available to anybody using PowerShell on the local machine.
Let's keep the scope to not require administrative rights (which those folders require to change at all), and create the Documents\WindowsPowerShell\Modules folder.
The full path for my instance of PowerShell can be found by using:
(Get-ChildItem Env:\PSModulePath).Value.Split(';')[0]
Find out if that matches your Documents folder as well. If it does not, iterate through the array by using [1] or [2] at the end of the Get-ChildItem command.
When you find the one that matches, use the following command to create the folder:
New-Item -Path (Get-ChildItem Env:\PSModulePath).Value.Split(';')[0] -ItemType Directory
Navigate to that location via:
Set-Location (Get-ChildItem Env:\PSModulePath).Value.Split(';')[0]Create a folder for our module named Part6. Note: This is what PowerShell will display the module name as.
New-Item 'Part6' -ItemType Directory
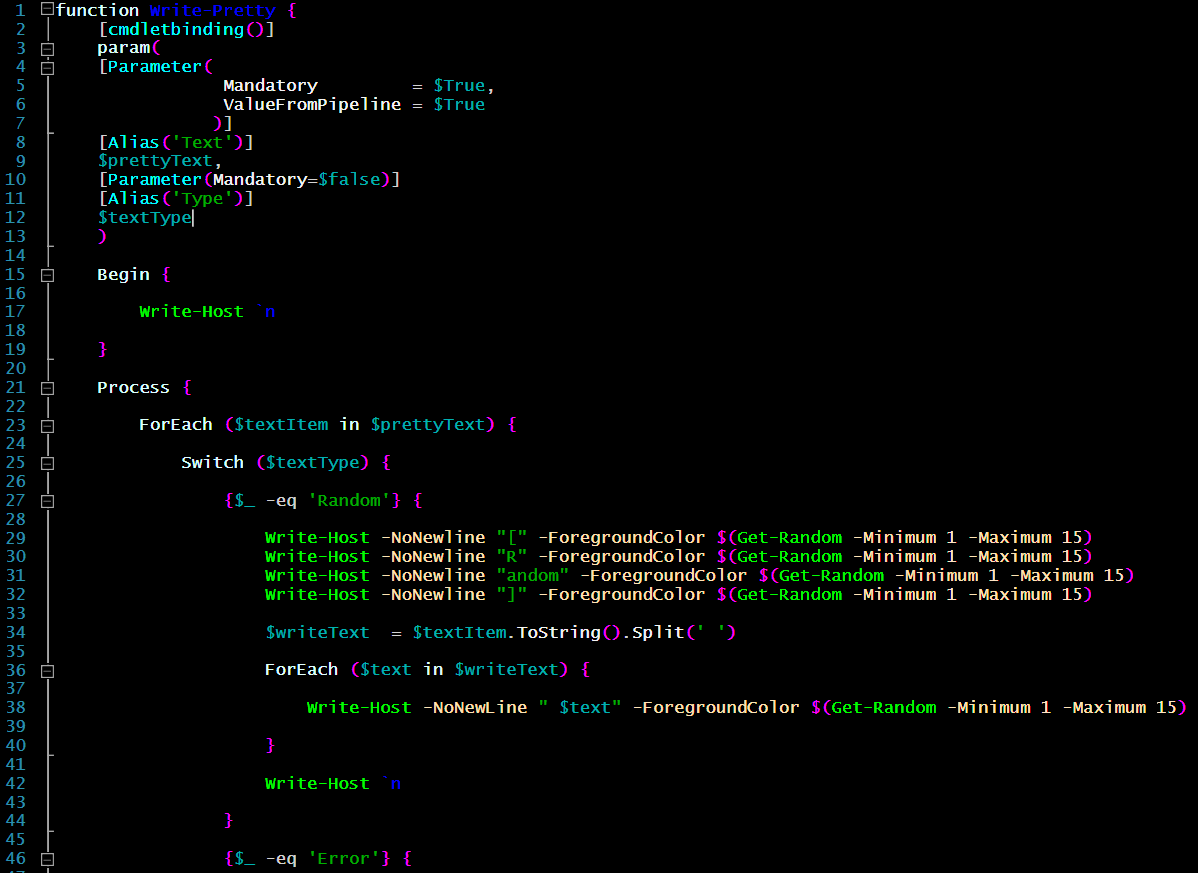
Now launch the ISE, and paste the following code in:
function Write-Pretty {
    [cmdletbinding()]
    param(
    [Parameter(
                Mandatory         = $True,
                ValueFromPipeline = $True
               )]
    [Alias('Text')]
    $prettyText,
    [Parameter(Mandatory=$false)]
    [Alias('Type')]
    $textType
    )

    Begin {

        Write-Host `n

    }

    Process {

        ForEach ($textItem in $prettyText) {

            Switch ($textType) {

                {$_ -eq 'Random'} {

                    Write-Host -NoNewline "[" -ForegroundColor $(Get-Random -Minimum 1 -Maximum 15)
                    Write-Host -NoNewline "R" -ForegroundColor $(Get-Random -Minimum 1 -Maximum 15)
                    Write-Host -NoNewline "andom" -ForegroundColor $(Get-Random -Minimum 1 -Maximum 15)
                    Write-Host -NoNewline "]" -ForegroundColor $(Get-Random -Minimum 1 -Maximum 15)

                    $writeText  = $textItem.ToString().Split(' ')

                    ForEach ($text in $writeText) {

                        Write-Host -NoNewLine " $text" -ForegroundColor $(Get-Random -Minimum 1 -Maximum 15)

                    }

                    Write-Host `n

                }

                {$_ -eq 'Error'} {

                    Write-Host -NoNewline "[" -ForegroundColor White
                    Write-Host -NoNewline "Error" -ForegroundColor Red -BackgroundColor DarkBlue
                    Write-Host -NoNewline "]" -ForegroundColor White
                    Write-Host " $textItem" -ForegroundColor Red

                }


                {$_ -eq 'Warning'} {

                    Write-Host -NoNewline "[" -ForegroundColor White
                    Write-Host -NoNewline "Warning" -ForegroundColor Yellow -BackgroundColor Blue
                    Write-Host -NoNewline "]" -ForegroundColor White
                    Write-Host " $textItem" -ForegroundColor Yellow


                }

                {$_ -eq 'Info' -or $_ -eq $null} {

                    Write-Host -NoNewline "[" -ForegroundColor White
                    Write-Host -NoNewline "Info" -ForegroundColor Green -BackgroundColor Black
                    Write-Host -NoNewline "]" -ForegroundColor White
                    Write-Host " $textItem" -ForegroundColor White

                }

                Default {

                    Write-Host $textItem

                }

            }

        }

    }

    End {

        Write-Host `n

    }

}

Write-Pretty -Text 'Part6 module loaded!' -textType Random
Once you have the content in the ISE, save the file in the Part6 folder we created as part6.psm1.
Congratulations! You just created your first module file.
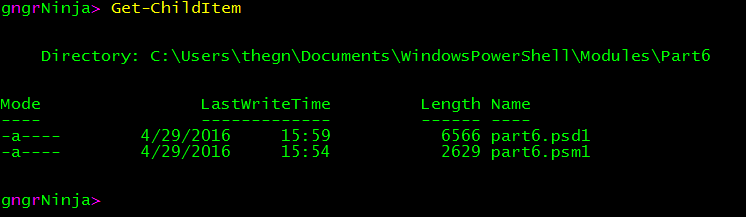
Navigate to the folder containing Part6.psm1 in PowerShell.
cd .\Part6\
Use the following command to create the module manifest file:
New-ModuleManifest -Path .\part6.psd1 -NestedModules 'part6.psm1'Use Get-ChildItem to list out the files. You should see part6.psm1 and part6.psd1.
The module manifest file contains the metadata for your module. Check out this link for more details on manifest files: https://msdn.microsoft.com/en-us/library/dd878337(v=vs.85).aspx
Import a module
Let's import the module we created!
Make sure you see it via:
Get-Module -ListAvailable
Now that we see it, let's manually import it via:
Import-Module Part6If all goes well, you should see a confirmation that the module was installed.

With this module, we get a new command: Write-Pretty.
You can use:
Write-Pretty Test
Write-Pretty Test -textType Random
Write-Pretty Test -textType Error
Write-Pretty Test -textType Warning

You can also pipe a command to Write-Pretty. Let's try:
Get-Process | Write-Pretty
What about...
Get-Process | Write-Pretty -textType Random
Remove a module
To remove the module, simply run:
Remove-Module Part6
When developing your own modules, Import-Module and Remove-Module will be your friends. When you import a module, it is imported into memory in its current state at that moment. That means if you make any changes after importing, you will have to remove and then re-import the module.
Homework
Go over the code we used in the module!
How did we accept pipeline input?
What method did we use to iterate through each element received by the pipeline?
I hope you've enjoyed the series so far! As always, leave a comment if you have any feedback or questions!
-Ginger Ninja